Way back when, before nice graphical user interfaces, all we had was the terminal. I won’t waste time with a trip down memory lane. Suffice to say there were many cool terminal-based interfaces, and some of us still use terminals (or terminal emulators more likely). And there are still nice terminal-based user interfaces used by many of us, even if that’s just vim or emacs.
As I continue my journey learning Rust, I thought I’d take a stab at writing a terminal user-interface (AKA TUI). In this case I will leverage a Rust crate called ratatui. Ratatui provides UI widgets for building a TUI --- things like laying out your UI, tabs, tables, scrollbars, and the like. Ratatui focuses on the UI aspects, and leverages other crates for the low level terminal interaction. Several are supported, but the one I chose (and the most common?) is called Crossterm. I am going to focus here more on Ratatui then Crossterm, except as needed.
Note
Please note --- in this blog I may use “terminal” and “console” interchangeably. For someone who’s been around a bit like me, a console is a terminal, not something you play video games on. :)
To showcase Ratatui (and Crossterm) I am going to create a simple text file “viewer” --- a TUI to display a text file and scroll around. The TUI will have a header and a footer and support some keyboard input for scrolling. In the future I might expand on this example to add features like syntax highlighting, large file support (right now I just load the full file without regard to file size), mouse support, etc. This first cut though will be simple (or simplistic depending on how you look at it).
Here is a screenshot of the finished TUI ---
The file name is displayed in the top left. There is a scroll bar on the right. And there is a footer with some keyboard commands in the bottom left and some file metadata on the bottom right.
Enough intro, let’s get coding …
Creating the project
Using cargo let’s create a project and add some dependencies.
cargo new fileviewer-tui
cd fileviewer-tui
Rather than showing all the cargo add
commands for the required dependencies, here’s the list (current
versions may vary depending on when you read this of course):
[dependencies]
ratatui = "0.29"
crossterm = { version = "0.28", features = ["serde", "event-stream"] }
serde = { version = "1.0", features = ["derive"] }
serde_derive = "1.0"
tokio = { version = "1.44", features = ["time", "macros", "rt"] }
tokio-util = { version = "0.7", features = ["rt"] }
signal-hook = "0.3.17"
futures = "0.3"
clap = "4.5"
chrono = "0.4"
color-eyre = "0.6.3"
log = "0.4"
The main requirements are the first two, ratatui and crossterm but as
you’ll see later, I’m leveraging an example from the Ratatui
documentation to set up a generic, application-independent async console
event handling capability that allows separation between console events
and application code. The console events are handled and sent to the
application code (the TUI itself) over an event channel asynchronously
using tokio.
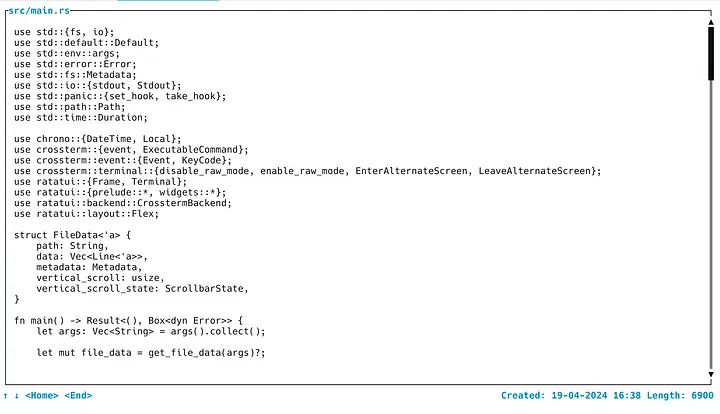
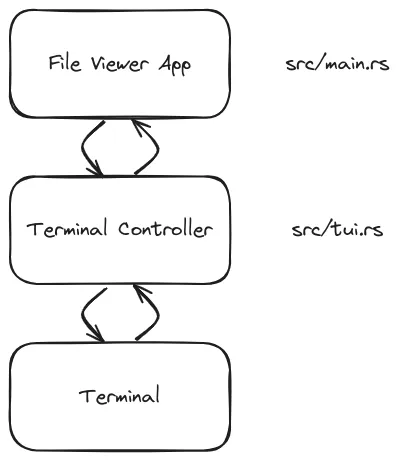
As such, the structure of our example application is
Understanding Terminal Interaction
When a user is interacting with a terminal session with a keyboard,
while the keys pressed may be “echoed” and shown in the terminal, nothing is
“really” happening until you press the <enter>key. The terminal is in a
line-oriented/buffered mode. Fancy terminals (again, really terminal
emulators) and shells may do things like suggesting command completion,
but even so, nothing actually is run until you press <enter>.
But in a TUI, you don’t want to have to hit enter after every action you
want to take. Imagine if you want to “page down” having to press
<page down><enter> or to move up or down a line having to do something like
<up arrow><enter> --- what a pain that would be. So one thing that needs to
happen is to tell the terminal to switch to a mode where every keystroke should
be presented to the TUI immediately. This is called “raw” mode. At the same
time, you need to be sure to switch back to the buffered mode when your TUI
exits (or crashes!).
Crossterm
This is where Crossterm comes in --- plus much more of course. Crossterm handles the details of working with terminals, and multiple types of terminals (hence the name). In our TUI, as part of the initialization, we use Crossterm to switch into this immediate mode we want for our TUI. We also set up a hook to ensure if our TUI panics, the terminal is reset properly and not left in a weird state.
All the Crossterm code is contained/encapsulated in src/tui.rs (or mostly ---
I have a dependency in src/main.rs on a Crossterm enum which I could clean
up). In tui.rs we have a struct Tui that exposes an API with methods like
- start/stop
- enter/exit
- suspend/resume
It also exposes terminal events like an Iterator by providing a next() method
(more on that later).
Info
As I mentioned earlier, this Tui struct is taken from the Ratatui documentation here.
To switch into the raw mode, the Tui struct exposes the enter() method,
wrapping Crossterm functions:
pub fn enter(&mut self) -> Result<()> {
    crossterm::terminal::enable_raw_mode()?;
    crossterm::execute!(std::io::stderr(), EnterAlternateScreen, cursor::Hide)?;
    if self.mouse {
        crossterm::execute!(std::io::stderr(), EnableMouseCapture)?;
    }
    if self.paste {
        crossterm::execute!(std::io::stderr(), EnableBracketedPaste)?;
    }
    self.start();
    Ok(())
}
Line 2 is the key line, calling enable_raw_mode(). The Tui struct contains
support for copy/paste and mouse interaction as configurable options which by
default are off (and not currently used in my example app).
The enter() method also calls the start() method on the Tui struct. This
method sets up and starts the async event loop, spawning a thread using Tokio,
handling events from Crossterm and making them available to the application over
an event channel (there’s a diagram later). Rather than creating a gist of the
entire start() method, just look at it
here
in GitHub (where you can see the full example code
as well).
FileViewer With Ratatui
Since I said I was going to focus on Ratatui and not Crossterm, let’s switch now and focus on our user functionality.
As with any UI framework, laying out the widgets is a big part of the task, and getting it right can be difficult. Ratatui exposes layout “controls” similar to other frameworks, whether it’s a web framework or a desktop framework. Within the layout(s) you set up various “blocks” to hold components like “paragraph” or “text” and various properties like margins and padding and text styles (color, font, etc). Here is a sketch of the UI layout
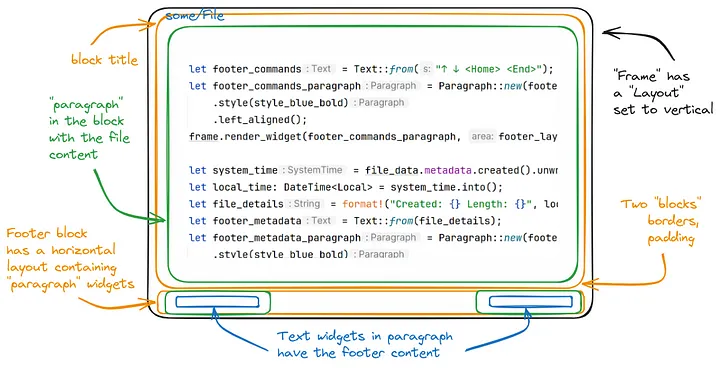
Setting up the Ratatui UI as shown in the sketch can be seen in the ui()
method in src/main.rs:
fn ui(frame: &mut Frame, file_data: &mut FileData) {
    let area = frame.area();

    let chunks = Layout::default()
        .direction(Direction::Vertical)
        .constraints([
            Constraint::Min(1),
            Constraint::Length(3),
        ])
        .split(area);

    let style_blue_bold = Style::default().fg(Color::Blue).add_modifier(Modifier::BOLD);

    let main_content_block = Block::new()
        .borders(Borders::all())
        .padding(Padding::new(1, 1, 1, 1))
        .title(file_data.path.clone())
        .title_style(style_blue_bold);
    let main_content = Paragraph::new(file_data.data.clone()) // todo: this clone() isn't great
        .scroll((file_data.vertical_scroll as u16, 0))
        .block(main_content_block)
        .wrap(Wrap { trim: false }); // 'trim: false' preserves indenting i.e. no strip whitespace
    frame.render_widget(main_content, chunks[0]);

    let scrollbar = Scrollbar::new(ScrollbarOrientation::VerticalRight);
    frame.render_stateful_widget(
        scrollbar,
        chunks[0].inner(
            // using an inner vertical margin of 1 unit makes the scrollbar inside the block
            Margin { vertical: 1, horizontal: 0 }
        ),
        &mut file_data.vertical_scroll_state,
    );

    let footer_layout = Layout::default()
        .flex(Flex::SpaceBetween)
        .direction(Direction::Horizontal)
        .constraints([Constraint::Ratio(1, 2), Constraint::Ratio(1, 2)])
        .split(chunks[1]);

    let footer_commands = Text::from("↑ ↓ <Home> <End>");
    let footer_commands_paragraph = Paragraph::new(footer_commands)
        .style(style_blue_bold)
        .left_aligned();
    frame.render_widget(footer_commands_paragraph, footer_layout[0]);

    let system_time = file_data.metadata.created().unwrap();
    let local_time: DateTime<Local> = system_time.into();
    let file_details = format!("Created: {} Length: {}", local_time.format("%d-%m-%Y %H:%M"), file_data.metadata.len());
    let footer_metadata = Text::from(file_details);
    let footer_metadata_paragraph = Paragraph::new(footer_metadata)
        .style(style_blue_bold)
        .right_aligned();
    frame.render_widget(footer_metadata_paragraph, footer_layout[1]);
}
Anyone who has worked with UI frameworks can make sense of a lot of this, just adjusting to the terminology used by Ratatui and the available widgets. To call a few things out
- Lines 4—10: this sets up the main two blocks --- the main file viewing block
and the footer block. Calling
split(area)on line 10 gives us an array to access each block later. - Lines 14—23: fills out the main block with the file content we loaded as part of the app initialization. It sets the block title to the filename and we set the current scroll position. As noted in the comment on line 22, we need to make sure whitespace isn’t stripped out from the file to preserve indenting.
- Lines 25—33: a scrollbar widget is considered a stateful widget in Ratatui. We create the scrollbar as a vertical scrollbar on the right of the screen, and we provide a place for Ratatui to store the scrollbar state (line 32).
- The rest of the method sets up the footer, with paragraph widgets on either end of the footer block.
Ok, so we have our UI constructed, now what? Who calls this ui() method and
how do we interact with the app?
First let’s show the app-specific struct that is passed to the ui() method,
used to store and display the file content.
struct FileData<'a> {
    path: String,
    data: Vec<Line<'a>>,
    metadata: Metadata,
    vertical_scroll: usize,
    vertical_scroll_state: ScrollbarState,
    quit: bool,
}- line 2: path to the file to view, specified on the terminal command line when
launching the app (e.g.
$ fileviewer src/main.rs) to display in the main block as shown earlier - line 3: a vector containing Ratatui
Linewidgets holding the file data to display in the main paragraph (line 19 of the earlier gist) - line 4:
std::fs::Metadatafor the footer content - line 5: which
Linein thedatavector is the current line - line 6: the aforementioned scrollbar state using
ratatui::widgets::scrollbar::ScrollbarState - line 7: a flag indicating the user wants to quit the app
Moving on to the main application processing loop (as opposed to the
struct Tui terminal event processing loop discussed earlier), we repeatedly
update the UI and handle events until the user presses Q/q or ESC
loop {

    tui.draw(|f| { // Deref allows calling `tui.terminal.draw`
        ui(f, &mut file_data);
    })?;

    if let Some(evt) = tui.next().await { // `tui.next().await` blocks till next event
        let mut maybe_action = handle_event(evt);
        while let Some(action) = maybe_action {
            maybe_action = update(action, &mut file_data);
        }
    };

    if file_data.quit {
        break;
    }
}
This is in the main() function in src/main.rs . (On either side of the loop
shown here is where the Tui struct is created and enter() and exit() are
called.) So what’s going on here?
- lines 3—5: (re)draw the UI periodically to refresh what the user sees. (This
is controlled by some properties on
struct Tuicalled tick rate and refresh rate.) - line 7: now that we have the UI drawn/updated, let’s block until we have some
terminal event. Recall from earlier I mentioned that
struct Tuiimplementednext(). This callsrecv()on a TokioUnboundedChannelto get messages sent by the terminal event processing thread, which itself gets events from Crossterm.
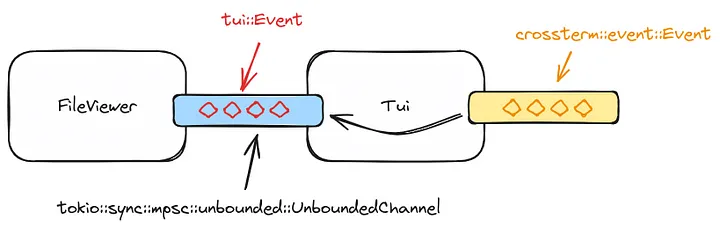
- lines 8—11: when we have a
tui::Eventwe callhandle_event()to turn thetui::Eventinto our own file viewing app event type, discarding any events we don’t care about. Then we perform any state update we need to perform. This is done in a while loop because it’s possible that one state change causes another, but in the current implementation that doesn’t happen, so that while loop is technically superfluous. - lines 14—16: one possible state change is that the user pressed the
q/Q/ESCkey and so thequitflag was set to true, in which case we exit the loop and the file viewer app. Another possible state change is that the user did some scrolling up or down, in which caseFileData.vertical_scrollwas changed. When we go back to the beginning of the loop to line 4, the UI will be refreshed and the view position of the main paragraph will get updated.
The handle_event() and update() methods are pretty basic things, and I
suggest looking at the main.rs
file if you’re interested, rather than elaborating on them here.
Wrapping Up
There are many things I can still do to this basic first cut at a simple file viewing TUI, as I mentioned at the start. But this was a good learning experience for me, in several different Rust crates and I hope it was interesting to you as well! If you enjoyed it, please let me know! If you have any suggestions are particularly any specific Rust aspects where I’ve exposed my rookie Rust knowledge, let me know that too!